Sculpture is Dirty


It's midterms week. I've been up long nights in the library working on preproduction for my short film (screenplay's almost done..), long nights in the sculpture studio carving away at my many projects, tedious mornings in the jewelry lab welding and powder coating... and I wonder why my lungs won't stop coughing.

This is me, cramming early in the morning to finish my blueprints for Ponoko.com, a laser cutting service. I designed some little tea candle holders to have cut in hardboard, and they'll be shipped to me soon. If my design works the way I planned, it'll slide together with no glue required.

If my design is good enough, maybe I'll start producing a line of these little tea lights to sell.


I worked in the studio tonight for five hours, and recorded some footage along the way. It may be easier to explain my process in film; I'll see about making a few of these shorts. Sorry for the small frame, I've got an ancient version of Final Cut Pro and it doesn't render video well... and the sound on my Mac HATES the airhose haha, you've been warned!


The Scavenger Project

Does anyone else wanna do this with me? It's a $15 registration fee, but you're guaranteed a spot in their Brooklyn/Seattle gallery shows AND a spot in the published book. You can also pay a little extra and get a T-shirt with your scavenger list on the back, and a copy of the final book. This sounds like an awesome opportunity to practice quickfire sculpture and photography (a la Erwin Wurm), plus, it'll get your name out there. I think it'd be helpful to get a few people doing it simultaneously, so we can brainstorm. I'm signing up either way. If you're interested, PLEASE let me know! Contact me via Facebook: Savanna Leigh or at SavannaLeighArt@gmail.com
From their blog:

This is as much a social experiment as it is an art exhibition. Any medium may be used as long as it can be shipped to us (or photos taken and included on a CD). Experimentation and thinking outside of the box is the name of the game. We mail you a list of 10 items for you to visually interpret along with artists from all over the world!
The final outcome is to document the project in two ways, including multiple exhibitions (at galleries in Brooklyn, NY and Seattle, WA) and in a book.
To sign up please visit http://arthousecoop.com/projects/scavengerproject

Movie Making

I haven't posted anything I've done in my film production class so far... here you go!

These are both simple silent studies to learn the mechanics of filming and editing. The first was shot out of sequence, the second is a location study of Alzaruba's home and studio. They're not much, but they're a start. I'm really diggin preproduction- storyboards, shot lists, site contracts, scheduling...


Casting Process: Fiberglass

It's been what, three weeks, and I'm finally read to cast. This is it- you either do it right, or you ruin everything, and it's all decided in about 15 minutes. Work fast and accurately. I did this casting as a demo for the Sculpture 1 class- I'm starting to really like teaching..
Prep the mold the night before- Paint on an even coat of Shellac to seal the plaster. When that's dry, paint on a layer of paste wax to act as a release agent. When that's all finished, the mold is ready for the gel coat. This is the first layer that captures all the detail in your image. Use Bondo car body filler. Wear gloves.
Fill a wax cup with Bondo, and add a dash of fiberglass resin to make it thinner. Knead the Bondo's tube of red catalyst till it's no longer watery, then squeeze some into your cup and mix thoroughly. The chemicals will not begin to react until you add catalyst. The Bondo should be light pink- if it's too light, add more. If it's too dark, it'll kick really fast and you'll have very little pot time.
Paint the Bondo mix all around the mold, avoiding air bubbles. Push the Bond to the lip of the mold, but be careful to keep the sides clean. When it starts to kick, the chemicals heat up. Let it set for 30mins, or till it's dry to the touch. Wash all tools in acetone. Cut up fiberglass matte into squares of different sizes, and have them ready and on hand. Wear gloves and sleeves... Fiberglass will make you itch all day if the fibers get in your skin.
Pour fiberglass resin into a wax cup and add its catalyst: MEKP (methyl ethyl ketone peroxide) will make you blind if it gets in your eyes, it'll burn your skin, and it's somewhat explosive... so handle with care. I think the ratio is 7 drops MEKP per tbs of resin... but I just kinda eyeball it. Mix it up, and paint it into the mold on top of the Bondo. Lay fiberglass matte into the resin, and paint more resin on top till the matte is soaked. Make sure the matte squares overlap; this is where fiberglass gets its strength. Add more layers and you could run this sculp over with a car no problem. (I didn't get a picture of this step while I was teaching)
Let it set for 45mins, or till it's dry and cool to the touch, and then break off the plaster with a chisel and hammer.

Et voila, I've got a body! It's lightweight, weatherproof, and super strong. It needs sanding, patching, and painting still, but I'm over the hump.

...

Special thanks to Willa Fan, who curated the show my paintings are currently hanging in. Though it's not a big show, it's garnered me some publicity- my site traffic is up 65%, and that doesn't hurt! Go check it out!

~Upcoming Events~

10/15/09- Moaning Pipe Cabaret this Thursday 6:30-8. I'll be playing music! Ukazoo Books on Dulaney Valley Road, Towson. No cover, free coffee!

10/16/09- Glassblowing this Friday 6-11 @ McFadden Glass Art on Eastern Ave Baltimore. I'll be blowing glass! Live glassblowing demos, drink specials, no cover, free parking.

10/17-09- Glitterama this Saturday @ Creative Alliance, shows at 7 and 1o. $12 for all the burlesque you can handle! The King of Kitsch, your well-greased host, Greggy Glitterati, brings you both the beauteous and the nutty in an evening of wonderment. The luscious Lena Grove of Gilded Lily. The titillating boylesque of Paco Fish. The socially-conscious puppetry of Sibelius and The Cause Company. Comedic burlesque babe, Ms. Shortstax. The death-defying trapeze of Nicollete Le Fay. Ms Malibu, the fiery mistress of Tiny Hats! The Living Balloons of the immaculate Poptarts! And laying the beats beneath the bumps, DJ Wachsentush!

Hope to see you there!

Casting Process: Molding pt 2

So, I tore the foamcore off the sides of my set plaster, used a rasp on the surface to make it nice and level so it sits soundly, and carefully flipped it over to reveal the clay beneath. Then it's time to dig all that hard work out of the mold... destroying the model is pretty fun though. My feet are in the image below, for a sense of scale.


Once the clay is all gone, I spent a while cleaning the inside of the mold with water and a paintbrush. Any residue left inside will end up on the casting, so I want it as clean as possible. I discovered a crap load of little airbubbles in the plaster... this is gonna be a pain later. That means that for every little hole in the plaster there will be a little bubbly wart on my casting that I'll have to grind down. Ah well, better luck next time. My splatter coat was probably a little too thick.

Once it's good and clean, I left it in the oven at 250*F for about 5 hours to dry it out. The thicker the mold, the longer the bake time. It probably could have used 7 hours. The plaster needs to be bone dry before moving on to the next step- it should be ready by Monday night.
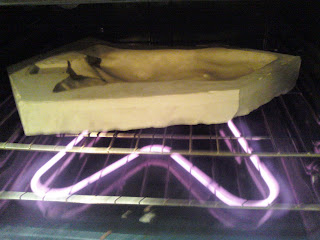

The Sculpture 1 class is learning how to cast in fiberglass, and I'll be using this mold to teach them via demo on Tuesday morning. I'll try to get pictures of the actual casting process, but if I can't, there are a few here.

...

Tomorrow I'm hanging a show on campus in Registration to benefit their ongoing Diversity themed art show.
My work will be up from 10/9-10/16
if you're around and want to see it. I had to write up a quick artist statement for the labels:

I am a sculptor, and I’ve been creating art and art objects my whole life. I’ve been trained in formal painting since high school, and have over the past few years begun to explore space in three dimensions. Now I try to combine drawing and sculpture by creating textures on the surface of my work reminiscent of painting, particularly in the stroke of Jackson Pollock.

My painting is highly process oriented and expressionistic; I am interested in the juxtaposition between action and reaction, or rather, cause and consequence. These abstract paintings are created in under an hour with no prior planning, which is why many of these works are painted on found materials such as cardboard and wood. There are no sketches, no pre-existing concepts, only the intention to express myself as quickly and as clearly as I can in a visual medium. There is no better way to describe the way I was feeling in a specific moment; these abstractions are my captured emotions.

In my sculpture, I am interested in investigating identity. I come from mixed cultural backgrounds and it's hard to find my own personal identity in any particular culture, especially in this American "melting pot." By blending the visual identities of multiple other cultures with America’s trite modern aesthetic in my art, I hope to create a facade of personal identity that is cultural, sexual, and religious. This mix of ideas creates a realistic combination of identity and hopefully offers the viewer a glimpse into someone else's world.
Casting Process: Molding


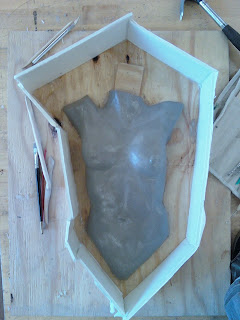
I like recording my process and techniques, mostly because I want to remember how to do this when I'm old and I've forgotten, and partly because it can get pretty complicated, and my instruction was lack luster. Hopefully I can help other people figure this out. I ruined plenty of molds before I ever got one to work properly. Here I'm making a one part plaster waste mold- So, once the piece is cast in fiberglass, the mold is broken off of it and destroyed. It's a one shot chance... hopefully this one will work out... fingers crossed!

Once the modeling was finished on this piece, it's time to start molding and casting. I built a foamcore wall around my model 1" taller than the clay's highest point. I filled in all gaps with hot glue, keeping the inside as smooth as possible. Once built, I covered every surface inside the mold with a thin coat of vaseline- this acts as a release agent, so the plaster doesn't stick to the surfaces. Never leave brush marks. That extra little chunk of wood at the neck is there to create a positive shape in fiberglass once it's cast- I'll be able to drill holes into it and attach the separate wooden head there.


Once everything is covered in release agent, it's time to add plaster. The first layer of plaster is called a splatter coat, and it's supposed to be really thin and runny. You throw the plaster on the piece like Pollock till it's covered, then you blow really hard on the details to eliminate trapped air pockets. Let it set (plaster heats up as it solidifies; let this layer cure to cool), and continue adding thicker layers till it reaches the top of your mold wall. Then, let it sit overnight and then remove the wall and dig out the clay. I'll be doing that tomorrow night... I'll take more pictures.

...

Here's some glass I blew this weekend, Tim McFadden gaffing:

Manta Horn Platter

Saturn in the annealer

Glass Blowing


From earliest to most recent tumblers
(whatever I haven't given out as gifts)


Slowly.. I'm getting better at this


Caught Between Now and Then: The American Totem


Project for my carving class- the requirement was to make
a carved relief in wood.

This is made from one block of 3"x3" Basswood- not ideal for a relief. So, I cut it straight in half, joined the sides, and glued it together to make one 6"x6" panel- which is what caused the dark line in the center of the head. After setting overnight, I took the clamps off, drew my design, and attacked the wood with a dremel to remove the largest portions of mass. Once I had the rough cut done, I used chisels and other hand tools to carve the details and texture.

The Native American totem design was fine for class, but it really doesn't stand on its own as an independent sculpture. You'd never see it in a gallery... it needs a body!


This is a rough sketch in ceramic water clay- made it last night in about 3 hours. Once it's touched up, I'll make a one part plaster waste mold of this figure, then cast a gel layer in Bondo reinforced with fiberglass. It'll be hollow and tough as nails, and it'll all hang on the wall.


I've never really pegged myself as a feminist artist- I'm not an activist, I don't go to protests or meetings or read femme lit or anything like that... but for some reason my sculpture keeps moving in that direction. I like the idea of a strong male symbol on a female figure. I've got plans for another piece like this with a Batman head. What do you think?


top